The Samsung Galaxy S24 Ultra is a $1,300 engineering marvel, but for many US users, the out-of-the-box experience is underwhelming. If you’ve noticed that your photos look over-processed, faces appear like wax figures, or you’re missing candid moments due to shutter delay, you aren’t alone. Most people assume it’s a hardware issue, but the reality is that your Samsung Galaxy S24 Ultra camera settings are likely working against you.
- 1. The “Intelligent Optimization” Trap: Why Skin Looks Fake
- 2. The Ultimate Galaxy S24 Ultra Shutter Lag Fix
- 3. Resolution Mastery: S24 Ultra 200MP Camera Tricks
- 4. Expert RAW Galaxy S24 Guide: Shooting Like a Pro
- 4. The Advanced Expert RAW Galaxy S24 Guide: Beyond the Basics
- 5. Deep Dive: S24 Ultra 200MP Camera Tricks for Maximum Detail
- 6. Video Mastery: Turning the S24 Ultra into a Cinema Camera
- 7. The “Beast Mode” Galaxy S24 Ultra Shutter Lag Fix
- Conclusion: Taking Control of the S24 Ultra Camera
- FAQ for US S24 Ultra Users
To truly unlock the Pro-grade potential of this device, you need to stop relying on “Auto” and start fine-tuning the AI. This guide will walk you through the essential best S24 Ultra photography tips and the ultimate Galaxy S24 Ultra shutter lag fix to ensure your gallery looks like a professional portfolio, not a collection of blurry snapshots.
Guide at a Glance: The Pro-Fix Roadmap
- The Problem: Aggressive AI sharpening and shutter delay.
- The Fix: Adjusting Intelligent Optimization and using the Camera Assistant app.
- The Goal: Natural colors, instant capture, and professional RAW flexibility.
Key Takeaways for S24 Ultra Power Users
- Stop the Sharpening: Set Intelligent Optimization to “Medium” for realistic skin textures.
- Instant Response: Enable “Quick Shutter Tap” in Camera Assistant for an immediate Galaxy S24 Ultra shutter lag fix.
- Resolution Strategy: Use S24 Ultra 200MP camera tricks only for static, bright landscapes; otherwise, stick to 12MP.
- Pro Workflow: Follow our Expert RAW Galaxy S24 guide to get DSLR-like dynamic range.
Critical Performance Note: High-end photography requires massive processing power. If your system is clogged with background junk, your camera app will lag. Before tweaking these settings, make sure to remove hidden bloatware from your Samsung S24 to ensure your ISP (Image Signal Processor) runs at full speed.
1. The “Intelligent Optimization” Trap: Why Skin Looks Fake
By default, Samsung sets its “Intelligent Optimization” to Maximum. While this sounds good, it is the primary reason your photos “suck”. It triggers heavy post-processing that crushes shadows and smooths out skin until it looks artificial.
The Fix for Realistic Photos:
- Open the Camera App and tap the Settings (Gear icon).
- Navigate to Intelligent Optimization.
- Select Medium.
Why Medium? At “Maximum,” the phone uses heavy-handed AI to “beautify” the image. “Medium” provides the perfect balance of HDR (lighting) and natural texture, which is a staple in the best S24 Ultra photography tips shared by professional US photographers.
2. The Ultimate Galaxy S24 Ultra Shutter Lag Fix
Shutter lag has been the Achilles’ heel of Samsung phones for years. You press the button, but the phone waits a split second to focus and process before taking the shot. By the time the shutter clicks, your subject has moved.
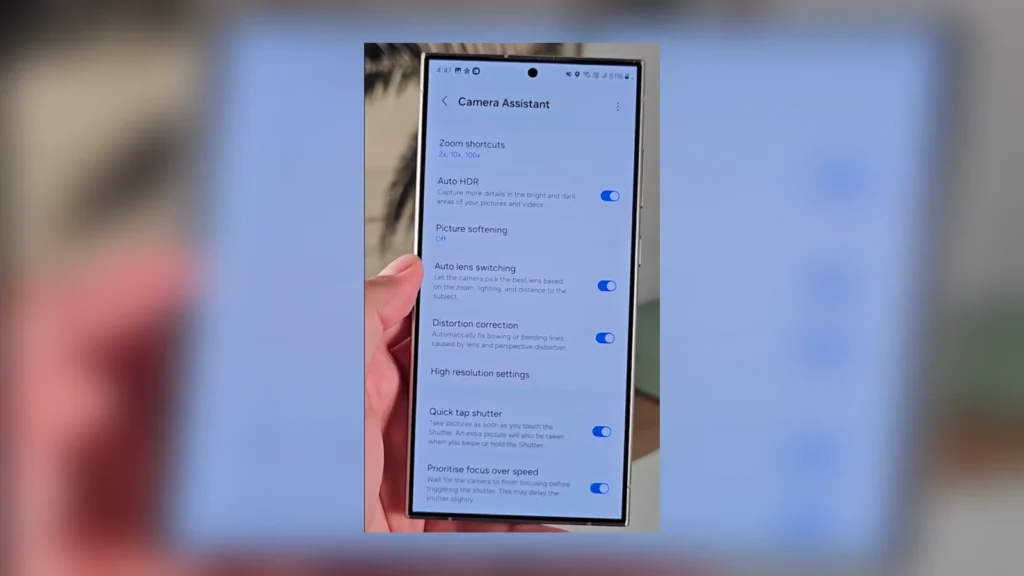
Pro-Level Fix via Camera Assistant:
To fix this, you need the Camera Assistant app (available on the Galaxy Store).
| Feature | Recommended Setting | Shutter Lag Fix |
| Quick Shutter Tap | ON | Takes the photo the moment your finger touches the button, not when you release it. |
| Prioritize Speed | Active | Reduces the number of frames the AI looks at, giving you instant capture. |
| Shutter Speed | High/Auto | Prevents motion blur in moving subjects like pets or kids. |
This Galaxy S24 Ultra shutter lag fix is a game-changer for anyone moving from an iPhone to Samsung, as it brings that “instant” feel to the 200MP sensor.
3. Resolution Mastery: S24 Ultra 200MP Camera Tricks
Marketing would have you believe that more megapixels always equal better photos. This is a myth that leads to grainy, dark images. The 200MP sensor has tiny pixels that struggle to gather light in typical indoor US home lighting.
How to Use the 200MP Sensor Correcty:
- The Daylight Rule: Only use 200MP for wide-angle landscape shots in direct sunlight.
- The Crop Trick: One of the best S24 Ultra 200MP camera tricks is using the high resolution to “digital zoom” after the fact. You can take a massive 200MP shot and crop a small section out; it will still look sharper than a standard 12MP zoom shot.
- Standard Shooting: For 95% of your life, stay in 12MP mode. It uses “Pixel Binning” to create large super-pixels that capture 16x more light, ensuring your night photos don’t suck.
4. Expert RAW Galaxy S24 Guide: Shooting Like a Pro
If you want to edit your photos in Lightroom to get that “Cinematic Tech Blog” look, you cannot shoot in standard JPEG. You need the raw data.
Our Expert RAW Galaxy S24 guide recommends:
- Using the 24MP resolution inside the Expert RAW app. It offers significantly more detail than 12MP without the massive storage headache of 50MP.
- Turning on Digital Lens Optimization to fix distortion in wide-angle shots.
- Saving files as High Efficiency RAW to keep your internal storage from filling up too quickly.
To truly unlock professional potential, you need to download the official Expert RAW app from the Samsung Galaxy Store. Unlike standard RAW, this app uses multi-frame synthesis to provide DSLR-like dynamic range.
4. The Advanced Expert RAW Galaxy S24 Guide: Beyond the Basics
While the standard camera app is great for snapshots, the Expert RAW Galaxy S24 guide is what separates the amateurs from the professionals. US tech creators swear by RAW because it captures the “unprocessed” data from the sensor, allowing you to fix exposure, shadows, and highlights in post-processing without losing image quality.
Why 24MP is the New Gold Standard
In previous generations, you had to choose between 12MP (too soft) or 50MP (too noisy). The S24 Ultra introduces a 24MP computational RAW mode.
- The Downsampling Logic: The phone captures a high-resolution frame and downsamples it to 24MP, effectively “cleaning” the digital noise while keeping the sharpness of the 200MP sensor.
- Dynamic Range: Expert RAW uses multi-frame synthesis. It takes several shots at different exposures and blends them into one 16-bit DNG file. This gives you a level of dynamic range that was previously only possible on DSLR cameras.
Astro-Photography: Capturing the US Night Sky
If you are in a low-light area (like the national parks in the US), Expert RAW includes a dedicated Astrophoto mode.
- Sky Guide: Enable the built-in star map to locate constellations.
- Long Exposure: It allows for exposures up to 10 minutes, using AI to track the movement of the stars and prevent “star trails”.
- Multiple Exposures: You can also use the “Multiple Exposure” mode to blend different shots together for artistic, ghostly effects.
5. Deep Dive: S24 Ultra 200MP Camera Tricks for Maximum Detail
The 200MP sensor is often misunderstood. Most people think more megapixels equal better photos, but on a smartphone sensor, it’s all about how you manage the light. Here are the S24 Ultra 200MP camera tricks that experts use to get billboard-quality shots.
The Lossless Zoom Hack (The 200MP Crop)
The S24 Ultra has a 5x optical lens, but what if you need 10x or 15x quality?
- The Technique: Instead of using the digital zoom slider (which ruins quality), take the photo in full 200MP mode.
- The Edit: Go to your Gallery, zoom into the subject, and hit the “Quick Crop” button in the corner.
- The Result: Because the original file was 200MP, your cropped image will still have about 20-30MP of resolution—far more than a standard 12MP zoom shot. This is the cleanest way to zoom in 2026.
Managing File Sizes and Shutter Lag
A single 200MP photo can be 50MB to 80MB.
- Warning: Capturing these large files puts a massive strain on the ISP (Image Signal Processor). If you try to take five 200MP shots in a row, you will experience the worst Galaxy S24 Ultra shutter lag imaginable.
- Pro Tip: Only use 200MP for “Slow Photography”—landscapes, architecture, or still life where the subject isn’t moving.
6. Video Mastery: Turning the S24 Ultra into a Cinema Camera
US tech blogs often ignore the video settings, but for a “Freakwolf USA” audience, this is crucial. The S24 Ultra can shoot 8K at 30fps or 4K at 120fps, but you need the right setup.
Advanced Video Settings to Change:
- Auto FPS (Disable it): In low light, Auto FPS will jump between 30 and 60fps to try and gather more light, creating a “judder” effect in your footage. Set it to OFF for a consistent cinematic look.
- HDR10+ Video: If you have a modern TV or iPhone to view your content, enable HDR10+ in the Advanced Video Options. It captures over a billion colors, ensuring your sunsets look smooth and not “banded”.
- Audio Zoom: The S24 Ultra has three microphones. When you zoom into a subject, enable Zoom-in Mic so the phone focuses the audio on the person you are looking at, cutting out background US city noise.
7. The “Beast Mode” Galaxy S24 Ultra Shutter Lag Fix
If you have followed the Part 1 guide and still feel your camera is sluggish, we need to go deeper into the system-level Galaxy S24 Ultra shutter lag fix.
The Hardware-Software Synergy:
Samsung’s camera app is heavy. Every time you open it, the phone has to wake up the sensor, the ISP, and the AI engine simultaneously.
- RAM Plus: Go to Settings > Device Care > Memory > RAM Plus. Set it to the Maximum (8GB). This gives the camera app more “virtual space” to store frames before they are processed.
- Device Protection: Ensure “Auto Optimization” is turned ON so your phone restarts at night. A fresh system is a fast system.
- The Bloatware Connection: We cannot stress this enough—if you haven’t followed our Samsung S24 bloatware fix, your CPU is likely juggling 50 unnecessary background tasks while you’re trying to take a 4K photo. Clearing the junk is the ultimate shutter lag killer.
Conclusion: Taking Control of the S24 Ultra Camera
The Samsung Galaxy S24 Ultra is not a “point-and-shoot” camera; it is a professional tool that requires a learning curve. By moving to Expert RAW, understanding the limits of the 200MP sensor, and applying the shutter lag fixes, you can finally stop saying “my photos suck” and start producing content that rivals professional gear.
FAQ for US S24 Ultra Users
My 5x zoom photos look blurry in low light. Why?
In low light, the phone often decides that the 5x optical lens isn’t fast enough, so it digitally zooms the main 1x lens instead. To stop this, use Camera Assistant and turn OFF Auto Lens Switching.
Does the “Warm” or “Cool” screen setting affect my photos?
It affects how you see the photos on your screen, but not the actual file. Always keep your screen on “Natural” mode when editing photos to ensure color accuracy for your US audience.
Can I use the 100x Space Zoom for professional shots?
No. Anything past 30x is mostly AI-generated “interpolation”. For professional results, stay under the 10x range using the S24 Ultra 200MP camera tricks mentioned above.